You're One Happy Camper
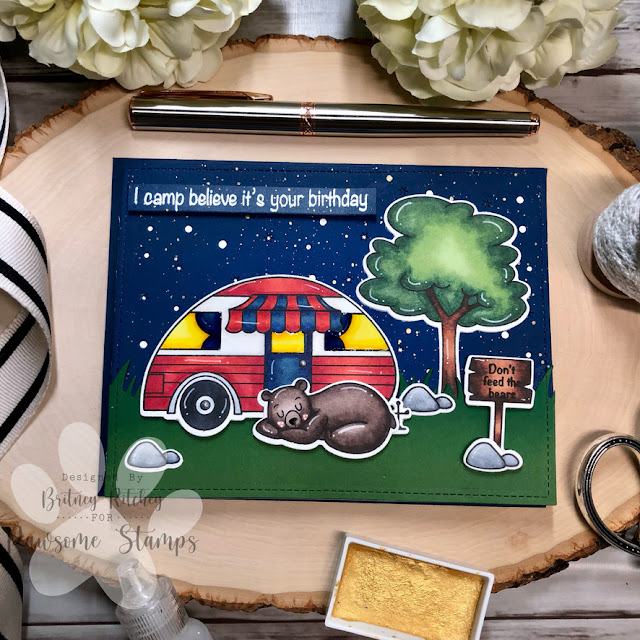
Starting with the background, I cut a panel out of dark blue cardstock using starry background die. Ink the edges with some Distress Ink. I used Hickory Smoke since I didn’t have Black Soot Distress Ink. I love Distress Oxide but sometimes it leaves a chalking finish on darker cardstock. Cut small section of paper using the dark blue cardstock used previously.
Make sure panel and strip of paper are completely dry before applying embossing powder as it will stick to the ink and splatter. If it does stick to places other than the sentiment, use a dry brush to remove excess powder. It helps to stamp the sentiment prior to adhering it to the card base with foam tape. Prep the paper using an anti-static powder tool. The Misti Stamping tool allows for stamping the sentiment multiple times to get a good impression. Arrange the sentiment and stamp using a clear embossing ink. Apply white embossing powder and heat with a heat tool to emboss the sentiment. Flip some gold watercolor paint onto the background to help give it a starry look.
Cut another panel of green cardstock using a stitched rectangle die to have a nice stitched border around the edge. This can be from a scrap piece of cardstock, as it will be used to make the grass. Use a grass border die and ink the edge for contrast.Using the Misti Stamping Tool and Lawn Fawn Jet Black ink, stamp images onto a piece of Neenah Classic Crest Solar White Cardstock. Use your favorite color medium to color in the images. I used Copics to color in my images. Use the coordinating dies or fussy cut the images. Use a white gel pen to create some highlights and a black glaze pen on the nose of the bear to give them some shine.
Stamping an image and sentiment on the inside finishes the card off nicely. It is easier to stamp an image and/or sentiment on the inside of the card before adhering the card panel to the base. The bulk of the foam tape can make it difficult to get a good impression using a Misti Stamping tool. To complete the front panel of the card, lay out images to determine perfect placement before popping up the sentiment strip, and images using foam tape and gluing everything else down using a liquid adhesive. Use a strong adhesive to attach the card panel to the card base. To complete the card, add Glossy Accents to the glass of the camper to give it a nice shine.
I hope you enjoyed this card as much as I enjoyed making it. Have a wonderful day and make sure to check out all the goodies in the Pawsome Stamps shop.


Britney, I just love this night time camping scene!
ReplyDelete