
Deck the Halls with Britney
Hey everyone, Britney here! I am so excited to be on the Pawsome Stamps blog today featuring the Deck the Halls Stamp Set. I will be decking my halls very soon!
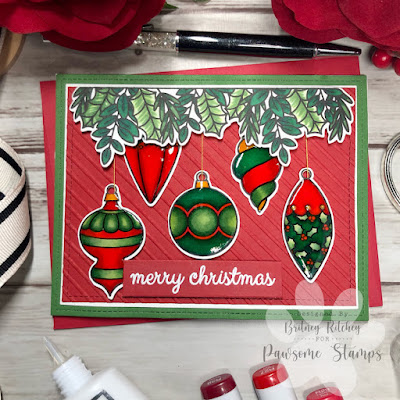
I always like to start with my background first and I have been really into layering lately. I used a stitched rectangle die for the bottom background. I used a smaller stitched rectangle die for my red layer. You can stop there but I wanted some bright contrast so I added a white piece of cardstock a little larger than my red layer. I wanted to create some interest so I put my red panel through an embossing folder to give it some dimension. I decided to use color cardstock to make it easy on myself. You can certainly do some ink blending to create more interest or even use a background stamp instead of the embossing folder.
Stamping an image and sentiment on the inside finishes the card off nicely. It is easier to stamp an image and/or sentiment on the inside of the card before adhering the card panel to the base. The bulk of the foam tape can make it difficult to get a good impression using a Misti Stamping tool. Once I stamped the inside of the card using images and a sentiment from the Just Sentiments: Christmas Stamp Set, I set both panels to the side to start working on my images.

I used the Misti Stamping Tool and a Copic-friendly ink to stamp images onto a piece of Neenah Classic Crest Solar White Cardstock. Use your favorite color medium to color in the images. I prefer Copics usually. You can fussy cut the images or use the coordinating dies. I normally like to add accents with a white gel pen, but I didn’t do that here because I knew I was going to be adding Nuvo Crystal Glaze to give it that glossy shine to make them look like ornaments. The Crystal Glaze was the VERY LAST step of making this card. It’s a little more runny than Glossy Accents and I always seem to smear it or put my hand in it somehow.

To complete the front panel of the card, lay out images to determine perfect placement. I dug through my sewing kit to find gold thread that I used to run through the top of my ornaments. I popped up my images using foam tape. Use a strong adhesive to attach the card panel to the card base. I white heat embossed a sentiment from the sentiment set I mentioned earlier onto a scrap piece of the same red cardstock I used for the base. I cut it using a sentiment strip die and popped it up using some foam tape. I added some Gold Nuvo Drops on the ornament with the holly on it. I let it dry for a few minutes before adding the Nuvo Crystal Glaze.

I hope you enjoyed this card as much as I enjoyed making it. Have a wonderful day and make sure to check out all the goodies in the Pawsome Stamps shop.


Comments
Post a Comment